
The course room is an open session dedicated to your course.

A Blackboard Collaborate link has been added to all Law courses. You will find it in the menu on the left side of the page. You must turn it on to make it visible to students.
To view an overview on Blackboard Collaborate, click here.
To view a video on Accessing Blackboard Collaborate, click here.
The course room is an open session dedicated to your course.
This course room is on until you turn it off. Instructors don't have to be present for students to join the session. If you don't want students to join a session unsupervised, lock the course room and create scheduled sessions.
To disable the course room, open the More options for Collaborate menu. Select Disable course room to prevent your students and other course members from accessing it. The Join session link changes to say Room disabled. You can re-enable the course room from this same menu.

1. From the Sessions list, select Create Session. Give the session a name.
2. Event Details
The event needs some basic details before creating.
Collaborate uses your computer’s local time zone for session start and end times.
3. Customize Session Settings.
Decide who can do what in your sessions.
You must add links to Scheduled Sessions in your Course Content in order for students to join.
1. Find the session you want and open the Session options menu.

2. Copy the session guest link (Ctrl+C).
3. From within your Course Content, select Build Content.
4. Select Create and select Web Link.

5. Name the link and paste the session link in the Link URL field.
6. Select Save.
To join a session:
1. Navigate to Blackboard Collaborate Ultra Scheduler from the Course Tools Menu.
2. From the Scheduler, select the session you want to join.
3. Select Join session.

Moderators and presenters can upload certain types of content or share the desktop screen with participants. Blackboard Collaborate Ultra performs best in Google Chrome. Moderators and presenters must have the Chrome extension installed for desktop and app sharing to function within the browser.
Sharing Files
|
 |
Sharing Whiteboard:
|
 |
Sharing Applications:
|
|
Sharing PowerPoint:
Sharing Video (NEW!): Until recently, attempts to share video content would not include any accompanying audio material. That has changed with a recent update to Blackboard Collaborate. Now, when moderators and presenters share a video in a session, all attendees can hear the audio. In order to use the Share Video in a Chrome Tab feature, use the following sequence of steps.
|
|
If you are using Blackboard Collaborate for instructional sessions, you should record them so that students can access them later. Only moderators (instructors) can turn recording on in sessions.
Recorded sessions are compressed and saved as MP4s. Recordings include activity in the live session.
Open the Session menu and select Start Recording. The recording camera appears on with a red dot while recording is in p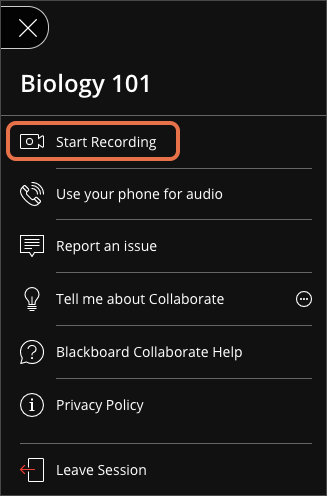 rogress.
To finish recording, open the Session menu and select Stop Recording.
Recordings need to be converted into a playable format before viewing. The first time a recording is accessed the conversion begins. It may take a few minutes but once is has been done the recording can be viewed by everybody.
If you allow it, students can download recordings and transcripts from the Recording menu.
Open the Recording menu at the top left of your screen.
Find and Post Recordings:
After a session ends, you can access an attendance report and push points to the Grade Center. The points are solely for attendance.
1. In the session's menu, select View Session Attendance.
On the View Session Attendance page, you see a list of the students who attended the session. If a student exited the session and returned, his or her name appears in the list again.
2. To automatically award the predetermined points for attending the session, select Post Attendance to Grade Center. You can't select which users receive points, but you can adjust points for individual users from their Grade Details pages in the Grade Center.
3. In the Grade Center, point to the column heading to view more information about the column on the Grade Information Bar. You can edit the column title in the column heading's menu.
